
Create a Lightroom Slideshow with music
The first thing I did in Mr Jones' digital imaging class?
Make a slideshow for Isaac.
Okay, I think the very first video I made was about baking soda bottle rockets. It totally included close up clips and wider clips. My video skills were on point. 😂I kid, I kid.
But the slideshow for Isaac? All I had to do was resize every single image.
And manually add every image to Final Cut Pro.
Then I resized every image to fill the video screen.
Then I added the music.
Then I manually added the crossfades.
I'm telling you... it was a process. A process that I spent hours and hours on. Worth it? I mean... our kids are going to laugh so hard at our clothes and hairdos so yeah. Yeah, it was worth it.
But there's an easier way.
I give you the Lightroom slideshow.
And this is no overly techy blog post. Making a slideshow in Lightroom is really simple!
Lightroom Slideshow Video tutorial
Here's a 5 minute video where I'll show you exactly how to create a slideshow in Lightroom.
I'll take you through every panel so that you know what you do and don't like, where to find the best music and how to export this slideshow from Lightroom!
Creating a slideshow is easy and I'll show you how to create a slideshow template so you only have to plug in the settings one time.
From here on out, you'll be able to build your slideshow with the click of a button.
Ready to get started? Click play on the video below.
Why create a slideshow?
If you're a small business owner, you know that video is where it's at.
By 2019, video will account for 80% of all internet traffic (source).
So it's time for us to start thinking about how we can put our business in video form.
You don't need to know how to create cinematic videos to market well.
You don't need to have all of the latest gear.
PHOTOGRAPHERS...
You're already in Lightroom editing away and you could easily click "Slideshow" and create a video portfolio of your work.
Upload that to Instagram when your blog post goes live or facebook as a sneak peek. Upload it to YouTube and keyword it so that you show up in search results.
now all you need to do is click "Slideshow" and Lightroom will even sync your music to your photos.
SMALL BUSINESS OWNERS...
You can use images from your DSLR or your phone for this slideshow. Just got back from an Alaskan cruise?
Import your images, do a quick editing session and share your photos on Instagram.
Take photos of your product, add some music (it's super easy to add music... click-of-a-button easy!) and upload that video to YouTube.
Now you can reach more people with the power of the second largest search engine in the world — aka YouTube.
Or you could include that video on your website to keep people engaged.
MOMMAS, COLLEGE STUDENTS, TEACHERS...
Where are the mommas, college students, teachers, high schoolers, single ladies and adventurers?!
Create a slideshow for your daughter's first birthday party and set it to the sweetest JJ Heller song and play it on repeat. Cue the tears.
Create a video slideshow of your latest spring break trip, your senior year, your sweetheart or a birthday slideshow for your best friend.
Step by step tutorial for creating a slideshow in lightroom
1. Open the Slideshow Module in Lightroom
Select the images you want to use inside the Develop module and then click "Slideshow" in the top right section of Lightroom
Lightroom will apply a slideshow template to your images, but you're building a brand here!
Or you're building a slideshow for your kiddo's birthday party. That, too.
Let's make some customizations to your slideshow to make it... well, a little easier on the eyes.
Here's how you can adjust the image border, background color and even add music to your slideshow!
Related Post: Make Lightroom faster with this

2. options panel — zoom, border, shadow
You can watch this section in the video at the 0:34 mark.
ZOOM: Click "zoom to fill frame" if you want to zoom in on every image in Lightroom.
I prefer the white border, so I leave this box unchecked.
If you're working with smaller images... like phone photos... then you'll want to leave the "zoom to fill frame" feature off. You won't have enough image data to enlarge the image.
And let me just say — way to go! Creating family slideshows for each month of the year... or maybe even the whole year is something I'm excited to do.
Just imagine the memories you'll have to play at Thanksgiving and Christmas!
Okay, one more thing about the zoom feature.
When you select it, you'll notice that your nice DSLR images get blurry or pixelated.
This is just because you're seeing a preview of the slideshow, so don't worry.
Once you hit "play" at the bottom of Lightroom, your images will render and everything will show up perfectly fine!
STROKE BORDER: The stroke border is the border around your image.
You can change the color of the border by clicking the color box on the right side. A color selector will pop up and you'll be able to select any color you want for your border.
You can also change the width of your border.
I chose to go with a white border and a width of 1 pixel.
If you're going for something a bit more playful, type in 10 pixels or even 30 pixels for the border.
CAST SHADOW: This is the same as a drop shadow.
There's no right or wrong way to create your slideshow so turn the shadow on and off to see what you like best.
I loved leaving it on just to create some separation between the images and the background!

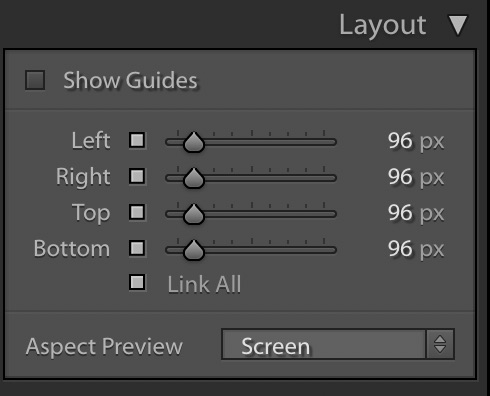
3. Layout panel — guides
You can watch this section in the video at the 1:02 mark.
Here you can control the size of your images!
If you want to see the lines, click "show guides." I leave this on because it helps me to see how the adjustments (left, right, top & bottom) are effecting the overall slideshow.
If you want the images to be perfectly centered, leave "link all" checked as you drag around the sliders.
You'll notice that all of the sliders move together when they are linked.
If you want to put the image in a corner or bring it toward the bottom — you know, so you can add your logo to the top — then you can uncheck "link all" and increase the bottom.
Related Post: Lightroom to Instagram export settings
4. Overlays panel — watermarking, overlays, logo placement
IDENTITY PLATE: You can watch this section in the video at the 1:16 mark.
Add a logo to your slideshow.
Or maybe you plan on putting this slideshow on your website?
Type a call to action: "Click the button below to __________."
Using this for a senior graduation video? Type in the senior's name.
WATERMARKING: I'd say leave this feature off.
You're already adding a logo so including text on an image with a copyright symbol is overkill.
In fact, I'd say to stop watermarking your images all together.
It's easier on the eyes.
It says that your priority is your work, not your credit.
This will make your clients want to share your work.
Win, win!
RATING STARS: This will display the number of stars that you've given an image.
It might be a feature to use if you're doing print sales and you want to quickly show a client all of their favorite images.
But if you're using this to market your work, leave it off.
Unless.
Oh, I just had an idea!
What if you're a little league photographer and you put together a slideshow for a baseball team? You could give a 5 star rating to all of the photos and I bet that would make those baseball players feel extra special. Right?! If you do that, tag me on insta story.

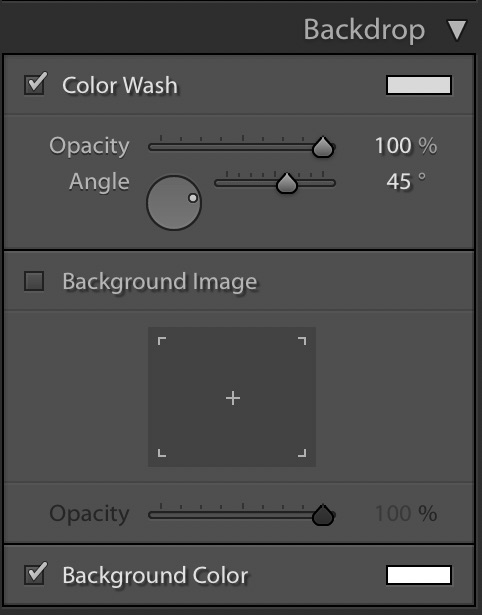
5. Backdrop Panel — color wash, background color
You can watch this section in the video at the 1:45 mark.
COLOR WASH: This feature acts like a gradient.
Aka a shift from one color to the next.
In this case, it's a shift from your background color to the color you select for your color wash.
I went with a light grey for a softer gradient that still brought some interest to the slideshow.
And why in the world do you need to add interest?
Well, in the land of video, video, video, it's pretty easy to watch 3 seconds of a clip and move on.
A gradient in the background would keep the eye entertained for just a little longer.
BACKGROUND IMAGE: Here you could select a background image to use for the slideshow.
The best image for this?
An image with simple lighting, composition and coloring.
Then that image isn't taking away from the rest of the images in your slideshow.
BACKGROUND COLOR: Select the color for your background.
If you want this to go on your website, choose a similar color or a color that works well with your site.
I love a white matte look when I'm displaying my work, so I chose a white background.
Related Post: HSL panel in Lightroom
6. Titles Panel — Intro and ending screens
You can watch this section in the video at the 2:01 mark.
Here you can add text or a logo to the intro and ending screens!

7. Music Panel — add music to your slideshow
You can watch this section in the video at the 2:30 mark.
Turn on the music panel by toggling the grey bar on the left side next to "Music."
Click the "+" sign to locate the music file on your computer and Lightroom will add it to your slideshow for you.
To make sure you don't get into trouble with copyright laws, only use music that you have permission or the "rights" to use.
If you plan on. uploading the video to YouTube (a great way to store portfolio videos), sign up with Epidemic Sound and you'll get access to unlimited music each month.
If you've been jamming to a top hit and want to use that, check to see if you can purchase permissions from Song Freedom.
Just keep in mind that with top hits, you don't want to share that music anywhere online or you could get flagged for copyright violation.
Yes, even if you've purchased the rights to use the song for YouTube, your video could be permanently removed because YouTube sees it as a violation.
Ask me how I know. [face palm]
So learn a lesson from me and only use the top hits if you're playing them at home.
Want to be safe and never run into an issue? Go with Epidemic Sound.

8. Playback panel —Sync your music
You can watch this section in the video at the 3:15 mark.
SYNC SLIDES TO MUSIC: You can let Lightroom handle the timing and it will sync your music to the rhythm of the song you choose.
TIMING FOR ONLINE VIDEOS: If you're creating a slideshow to share online, go with 1-2 seconds for the slide length and 0-.5 seconds for the crossfade.
TIMING FOR EVENTS: If you're creating a slideshow for a rehearsal dinner, senior graduation party, birthday party, or work party, go with 4 seconds for the slide length and 1 second for the crossfade.
REPEAT SLIDESHOW: Check this box if you want your slideshow to loop.
This means that as soon as the slideshow finishes, it would automatically start over.
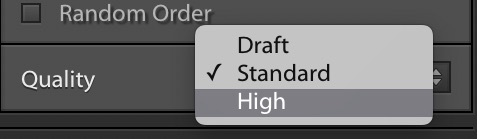
RANDOM ORDER: Check this box if you want your photos to appear in a random order.
QUALITY: Always select high!
This will increase the size of your video, but if you don't want to lose image quality so set the "Quality" to "High" in the dropdown menu.

9. Create a slideshow template for next time
You can watch this section in the video at the 4:27 mark.
You've done the work and made all of these adjustments.
How would it feel if next time you could just click a button and all of these settings would be applied to your slideshow?
Umm... yeah!
That would make this simpler and a lot more likely that you'd actually use the Lightroom slideshow feature, right?!
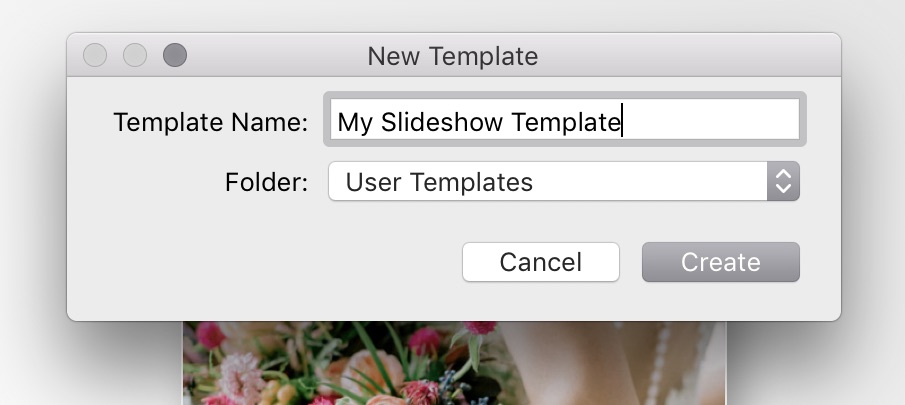
Over on the left side of your screen, you'll see a section called "Template Browser."
Click the "+" sign right next to it and type in the name of your slideshow template.
Click "create."
Next time you're all set to just click on your slideshow template and every single adjustment you just made will be applied to your video.
Related Post: How to plan a styled shoot

10. Export your lightroom slideshow
You can watch this section in the video at the 4:58 mark.
Now it's finally time to export this!
Go up to "Slideshow" and you can export as a...
+ PDF Slideshow
+ JPEG Slideshow
+ Video Slideshow
Select "Video Slideshow", give your slideshow a name and decide where you want the video to be stored on your computer.
And about that Video Preset...
This last option is asking you what size you want for your slideshow.
Always, always, always choose 1080p (16:9).
As I'm writing this, that's the largest file size that Lightroom offers and you'll need it if you plan on sharing your slideshow on a computer, youtube, facebook and even your phone.
Okay... technically not if you're watching on your phone.
But if you're ever going to watch it on a screen bigger than your phone, go with 1080p.


11. Share your slideshow
Now that you've done the work, it's time to actually share your slideshow!
Upload this to Instagram to announce a blog post. I bet that converts more visits to your blog post.
Add this to the end of a blog post to keep people on your site longer.
Share on facebook as a sneak peek.
Send the slideshow to google drive to store all of your family memories.
Play the slideshow at your daughter's high school graduation party.
Make a slideshow for your rehearsal dinner.

Love Pinterest?
You and me both! Pin this image so you can come back to this post anytime.
Name your board "Lightroom Tutorials" so I can find your faves!

You can use a slideshow anywhere!
And now you know the easiest way to create a slideshow.
I mean... you're already in Lightroom editing away at your photos, so why not take it one step further and create a video of all those images.
Up the experience for your customers or clients.
Use it at your daughters first birthday party.
I'm making notes to do just that by the way.
Imagine a slideshow of Hannah (who is 8 months... 8 MONTHS!) from day 1 to day 365.
With music.
And now that you've got your slideshow template, you can just click, add music and export!
Tell me below — what type of slideshow are you going to create?


